Instagram: Makeamark_artroom

Showing posts with label 4th grade. Show all posts

Monday, January 16, 2017

Dr. Martin Luther King Jr Collaborative Mural


Each year the 4th grade students perform a Martin Luther King Jr. program for the entire school. They sing songs, speak poetry, and recite spoken word about our nation's civil rights history and the legacy of Dr. Martin Luther King Jr. It is a really powerful performance that moves me to tears.

Last year, I had my 4th grade students create a painted paper mural to display during their performance. But not just a single class before. They were inspired by Faith Ringgold's "Aunt Harriet's Underground Railroad in the Sky".  The mural received a very positive response from the kids, the staff, and the parents. I decided to do something similar this year.

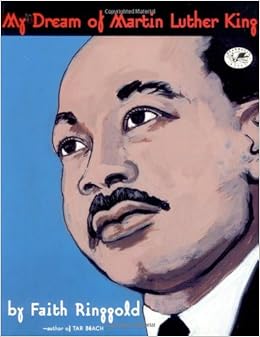
I began by introducing my students to Faith Ringgold's book, "My Dream of Martin Luther King".


https://images-na.ssl-images-amazon.com/images/I/51gMAKbqMtL._SX258_BO1,204,203,200_.jpg

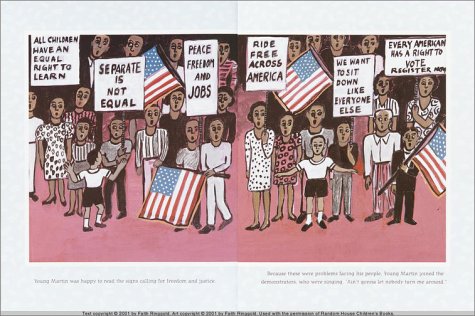
We closely examined the artwork and the students created sketches inspired by the book's illustrations. I also shared a short clip of Dr. King's "I have a dream" speech.

The next class, we worked together in choosing from their sketches and the book's illustrations in creating the composition for the painted mural. We worked in small teams to create the various sections of the mural. The kids were really excited to create!

We decided to have teams for:
Martin Luther King Jr.
The Dream Speech crowd
and Text quote
another class created doves for peace signs


Each small team was responsible for these sections of the mural. I provided printed resources and laid out their supplies. It was amazing how they set out to accomplish these goals. Each student was engaged in their role and we achieved the completed mural in 2, 45 minute classes.

Upon reflection, I believe my students were engaging in most of these 21st Century skills. 

download

I will continue to find ways for my students to hone these skills and create authentic art that is meaningful to them.

Thanks for stopping by!

Monday, December 5, 2016

Epic Tunnel Book Landscapes


Wow, this project was, well....enduring.

It began with our landscape unit of study. I wanted to offer my students a unique creative experience so I had researched ways to create 3D landscapes. My students really love creating 3D (not surprising, it is my favorite too...I really passionate about it). This art making endeavor ended up taking us 6 - 8 classes to complete, from introduction to final rubric assessments.


About 4 classes in, I asked my classes if they were still excited about working on their tunnel books and by and large, everyone was still invested. I was surprised and pleased!

I  am going to try and keep this succinct because I could write essays about the process, and I will, since I'm using this unit for my National Boards portfolio.

Our learning objectives were:
  1.   Create: I created a tunnel book landscape that has background, middle ground, and foreground layers with a horizon.

  2.  Engage & Persist: I developed a clear visual story within my landscape.
  3.  Planning: I considered and tried out a few ideas before and during my art making.
  4.   Develop Craft: I applied new art making methods/techniques as well made connections to my other artwork/experiences. (ex. tunnel book construction, watercolor painting, collage)
Our lesson sequence was:
  • Day 1 - Introduction to key vocabulary with visual examples in art history (google slides), created sketches, and assessed comprehension of landscape vocabulary 
  • Day 2 - Examined our sketches, planned for construction, introduction to construction
  • Day 3 - Created a background for the tunnel book
  • Day 4 - Created and assembled middle ground sections with accordion sides
  • Day 5 - Created foreground and attached viewfinder - assessed works in progress
  • Day 6/7 - Finalized construction, peer reviews
  • Day 8 - Self assessed with co-written rubric (teacher + student input)
 Here are some more the results. I didn't take many process photos because I was so busy chatting with the artists about their work.


These students worked so hard and were so proud of their results. They are displayed in our school's library for everyone to appreciate.

Thanks for stopping by!

Monday, October 24, 2016

Hope and Peace Monoprints created by 4th Grade


My 4th grade artists learned about the power of visual symbols by examining the big ideas of peace and hope. We discussed how artists use white doves, olive branches, the 2 fingers, and the linear symbol represent these concepts. We determine what peace and hope represent in our lives and why it is important to strive for those things.

After these discussions my students practiced sketching various symbols and chose one to use for their printing design. I then asked them to create a stencil to use for their Gelli-Plate monoprints.

I shared my demonstration video with them all before they created 2 prints using 2 colors.


The next class they added painted details to finalize their designs. We shared out our designs with each other then self assessed. They determined if they successfully communicated the ideas of peace and hope in their prints, successfully created 2 monoprints, and showed good craftsmanship.


We then assembled all of their prints together to create a collaborative single piece for the school's hallway.


Thanks for stopping by!

Thursday, August 11, 2016

Baron Batch inspired Reduction prints


Reduction Print is a multi-color print in which the separate colors printed from the same plate at different stages. 

Reduction printmaking with foam plates was a home-run! I want to thank Mr. Stoller at Thomas Elementary Art Blog for the informative and captivating post about relief printing with his 4th grade students. I knew my students needed to learn the foundations of printmaking as most of their only prior knowledge of printing was stamping and computer printing.  I also knew my kids like to be challenged and that they would appreciate a the task of reduction printing.

I began the lesson by introducing a contemporary artist as inspiration. I presented Baron Batch. A former NFL football player and artist. We focused on his "Free Art" street painting examples for our direct influences. I chose his "Elephant" painting as the prime example for animal portraiture.


These were student objectives through the process of creating authentic art inspired by Batch:
  • I asked the students to look through wildlife magazines and choose a photograph of an animal.
  • They had to sketch an animal portrait in their sketchbooks for my review
  • They then drew a contour drawing of their chosen animal
  • Then traced that drawing onto a foam plate 
  • They had to print one color onto a piece of white printing paper
  • The next class they added more details to their animals' faces and traced it onto their plate
  • They cut away (reduction) their animal from the late and inked a 2nd different color 
  • They lined up that foam piece and pressed to print
  • Some students had time to choose one detail to cut away and print a 3rd color 
  • They numbered their editions, wrote titles, and signed their work for our print exchange
Here are some of my Youtube tutorial videos I used for my classroom printing my "Electric Elk"


Here are some of their results.


 These kids were so engaged in the process of printmaking because it was new and they could judge their successes by the quality of their prints. They had choices along the way that allowed for their individual expression and exciting Baron Batch neon colors to use in their designs.

Let me know if you have any questions in the comment section below. Thanks for stopping by!

Monday, May 2, 2016

Birds upon coiled clay nests by 4th grade


My 4th grade artists have now had me as an art teacher for 2 years. Each year I am trying to build upon the previous years skill set. In clay, my students learned how to make coil pots last year as 3rd graders. This year, I wanted to challenge them further by teaching them how to hand model clay. I instructed them to build their coil nest first as a review, then they were to create a bird with their remaining clay.


The students learned the difference between greenware, bisqueware, and stoneware since they were getting the opportunity to glaze this year. I had no idea how happy the glaze would make them. They were really amazed how different glaze was from tempera paint and even more astounded at its final look after the 2nd kiln firing.


Thanks for stopping by!

Monday, April 25, 2016

Earth Week: Kinder through 5th

Last week, we celebrated "Earth Day" every day in the art room. We used recycled materials to create our artworks. Thanks to some really wonderful staff and parents who provided us with recycled supplies, we had a bounty with which to work. I still have several boxes  CDs left over from the library donations!

Each class, we began by discussing why protecting our planet is important. Students from kindergarten up through 5th grade made points about how a healthy planet is good for all living things. We talked about how we can do small things like recycling to help with waste and pollution. One of our enduring themes was recycling plastics so that they don't end up in landfills, or worse, our oceans.

Ocean pollution is a real threat to our marine ecosystems. Almost all of my art students got the opportunity to recycle plastics in their art making as a way to re-imagine the material. Some classes went a step further in demonstrating art activism in creating a collaborative mural to raise awareness about ocean pollution.

Here are some examples of the work we did!

Kindergarten recycled CDs from the school library to make tropical fish! They used pattern and color to make the scales using sharpie markers and cut shapes for fins. They were incorporated into the art activism mural.

1st graders recycled mixed materials from donations and the art room scrap bins. They used collage techniques to create a recycled robot. One class got to use donated corn starch packing peanuts to make sculptures. Just add a dab of water, and VOILA!, they stick together! Another 1st grade class created Spring blossom trees with recycled paper bags.

R2D2!

BB8!

I love how she matched the Sharpie hair to the yarn she chose.

The magic of corn starch peanuts in action!


A baseball player at bat!


2nd graders recycled plastic bags and lamination trimmings from the library to assemble jellyfish. We talked about how sea turtles mistake plastic bags for jellyfish and eat them, which makes them sick or even die.
I didn't capture too many  photos of this lesson...womp womp!

3rd graders recycled plastic bottles by cutting them and coloring them with sharpies to produce tropical fish sculptures to go with the art activism mural.


4th graders recycled CDs by producing mandala designs with sharpie markers. They showed radial symmetry in their compositions.


5th graders got an extra week to work on their clay sculptures due to a field trip that happened during clay week. We did make some time at the end of class to discuss Earth Day and how artists can use recycled materials to make powerful works of art.

My intermediate Pathways class assembled recycled robots as well, but used more advanced building techniques.


I think we had a great time making recycled artworks. I hope that my students learned about how they can make a difference in their art making as well taking care of their planet.  Here are some additional resources if my artists want to learn more about how artists use recycled materials to make fine works of art.