This was a 2 day art experience for my young artists and produced really fun results. I learned that this class was learning about 3-D forms in their classroom, so I thought it natural for them to produce them in a 3-D paper sculptures. I know this class has accelerated art skills, I knew they could handle the technical motor skills required.
We began on the first day reviewing lines and create line patterns on a rectangular paper. I then demonstrated how to bend the paper into a cylinder shape and glue it in place. I then shared how to make cuts on one end of the cylinder to create flaps. I used a flower petal analogy so they understand that these flaps should be the same size, like flower petals. Then then glued these to a base paper. They could make as many as they could in the remaining time we had in class.
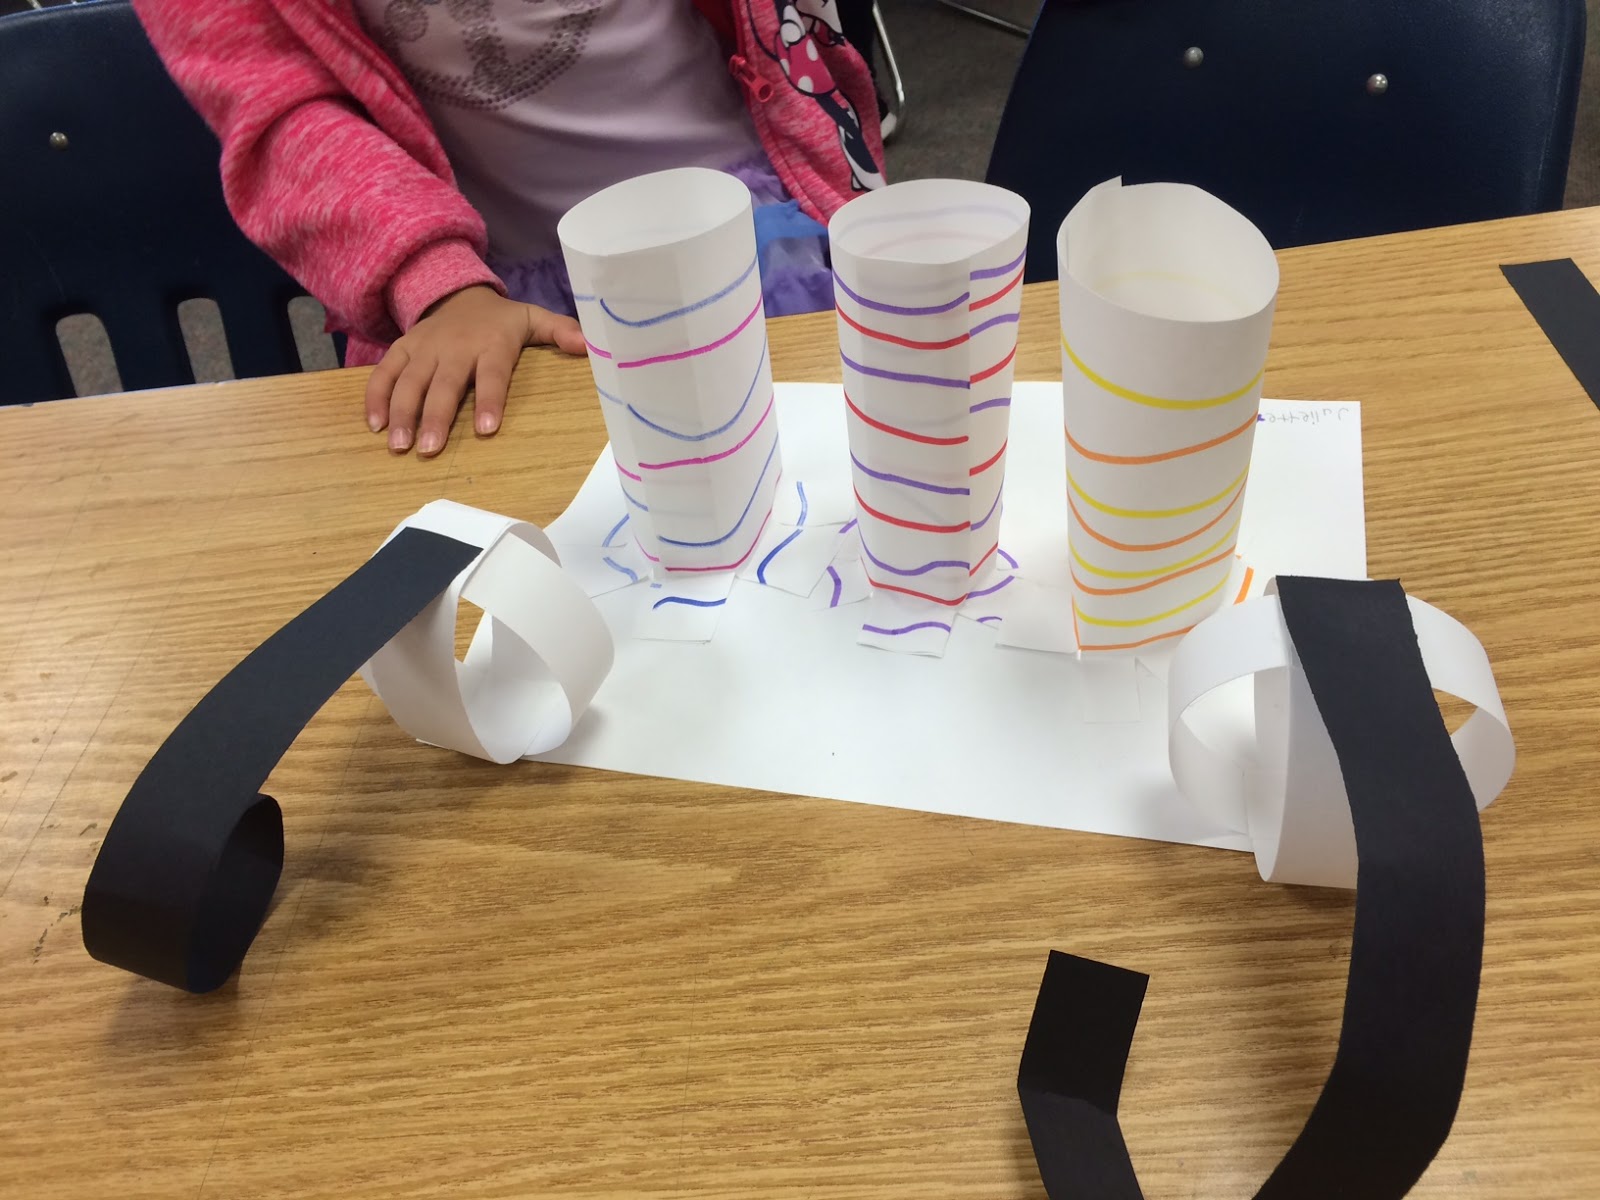
The second day I demonstrated how to attach strips of paper into an X and then bend each one to join them together with glue. This would produce a sphere form. They could make as many as them wanted. I also gave them black strips of paper to use for creating attachments. They've already practiced bending, folding and attaching paper in this lesson, Lines That Wiggle.
They had a blast building these sculptures. It was really sweet to watch them help each other and share their engineering ideas. I wish I could have snapped more photos but I was having so much fun talking with them about their creations.
When I meet my kinder students each year I love to introduce them to the art room by exploring the element of Line. It is an element they use as they learn to write letters and numbers. I also want to assess their motor skills. This paper sculpture lesson challenges them to create different types of lines by bending and folding paper while arranging them on a paper base.
I begin the lesson by reading the book "Lines that Wiggle", by Candace Whitman. This book as fantastic illustrations and wonderful rhymes about a variety of lines. Next, I ask the students to look around the room for examples of different lines. This allows me to assess whether they can identify and name lines.
When they've identified straight, curved, angle, and spiral lines I demonstrate how to change a flat paper strip into different types of lines. I show them how to apply glue and attach these strips to a base to create a sculpture. We talk about what a sculpture is and how it is different than a drawing. They are given lots of strips and paper base and off they go.
Each students' sculpture is unique. I really love when they tell me what each strip represents. For example, a student will point to a looped strip and tell me that it is a car and a curved strip is a bridge. Their powerful imaginations make this project really fun for both them and me.
It is Summer and I have to admit, my blogging fell to the wayside. I got married a couple of weeks ago and let's just say writing up posts wasn't a priority in the final weeks of school.
I finished my last day of teaching this year on June 20th and was married 5 days later. The last big unit I taught my kiddos was printmaking and now that I've had some time to reflect, I am ready to share our successes.
This is only my 2nd year teaching art at my elementary school. Most of my students haven't had many or any art classes before they met me. I didn't get to printmaking with them last year because I had so much groundwork to lay down but I made sure to cover it this year.
Here is what we did in the primary grades. I'm not going break down all of the steps here on the blog because I made some videos on my youtube channel. If you want to know more, please submit comment below.
Kindergarten: Wayne Theibaud inspired Gum ball machine prints.
We have been studying pop art in Kindergarten and what more fun way to experiment with printmaking than be inspired by Wayne Thiebaud's 1963 painting "Three Machines".
Wayne Thiebaud "Three Machines" 1963
oooooo! gold paint!
We practiced printing lines with cardboard, and circles with recycled glue stick caps.
1st grade: We practiced printing by using styrofoam plates and used the crayola marker ink to color and print them on wet paper. We drew cupcakes and angry birds to go with the whole Pop Art theme. Unfortunately didn't get any photos because I have 30 kids in these classes at the very end of the day....I'm usually running on fumes at this point of the day.
2nd grade: We first experimented with mono-printing by painting colorful landscapes inspired by contemporary English printmaker Chris Keegan. We quickly painted tempera on plastic transparency with thick paint strokes and pressed/rubbed paper on the wet paint to pull our prints.
Chris Keegan "Brilliant Sky"
We then used styrofoam plates to draw an angry bird. We colored them with crayola markers and printed them on white drawing paper. We cut these out and collaged them on our dried landscape paintings to make an Angry Birds game course. We glued a small piece of cardboard to the back of the Angry Birds to make them appear to fly. The kids LOVED this.
*One of my 2nd grade classes only got to see me twice for a total of an hour so they printed fish inspired by Sandra Silberzweig.
Sandra Silberzweig "Wild Tribal Sun Fish"
Phew! Printmaking is a blast.
Thanks for stopping by! If you have any questions, please leave a comment. I'd love to hear from you.
We are getting close to the end of our school year and I saved the Printmaking unit for the end. I wanted to keep these Summer ready kiddos engaged and Printmaking is a great way to do that. It is relatively easy to learn and the possibilities for artistic choice making is endless.
The kindergarten artists were practicing the most basic form of printmaking which is stamping. I instructed the students to begin by tracing rectangles in rows and columns on a large piece of drawing paper. Then they laid their pastels on their sides to color in each rectangle with different colors. They could mix colors with layers if they chose to do so.
To help guide our art making we looked at the "Alphabet Painting" by Jasper Johns. I didn't dig into Pop Art History too deeply with the kinders but we did discuss how we were able to recognize the alphabet and that Jasper Johns liked used very recognizable images in his artwork.
Jasper Johns "Alphabet" 1959
I then place trays of various paints at tables along with foam letter sponges. The students were to rotate to tables after about 30 seconds or so to stamp their foam letters into the paint and print them inside the rectangles on their papers.
The sponges I used I bought through my district's catalog.
For time constraints and ease of sponge access, I didn't require students to put the letters in order of the alphabet.
The next day I had the students choose a piece of skin toned construction paper (I had 6 different tones to choose from) so that we could do some guided drawing in creating their self portraits. I gave them a basic face shape to start with and encouraged them to add unique details such as freckles, missing teeth, etc.
They traced their drawings with oil pastels and glued it to their alphabet paintings. They painted their hair and added a paper shirt to finish.
Well, the school year is coming to and end in less than 30 days and my art students are feeling Spring Fever big time. I've decided to get out the paints for a color theory unit in hopes of keeping all of their busy minds focused and engaged. My kinder artists sure LOVE paint, let me tell you. Throughout the year I've periodically introduced brush techniques and paint management so that now they are ready to learn color theory. I begin with the Washington state standard of teaching them primary colors and secondary colors.
I begin by showing them the OK Go video shown on Sesame Street. The kids love it.
After this, I read them the book "Mouse Paint", by Ellen Stoll Walsh. I use the illustrations for inspiration for our color mixing art works.
I lead them through a guided drawing of the 3 mice and then we get to painting. I've used red, yellow, and blue paint as well as magenta, yellow, and cyan crayola paints in this lesson and I've found that the latter paints produce more vibrant color mixes. There is debate in the art education world whether red, yellow, and blue are not the true primary colors but magenta, yellow, and cyan should be taught instead. So, I introduce magenta as "red's sister" and that you can count her as a part of red's family. The kids get it.
As an extension of this lesson and another way for me to assess their understanding, I read them "Mister Seahorse", by Eric Carle.
I, again, lead them in a guided drawing as inspiration from the book's illustration and I demonstrated mixing colors. The kinders were instructed to paint the seahorses as they wished but must show the primary and secondary colors.
They were so excited to mix the colors and discovered that mixing all
3 primary colors can create brown. Who knew brown would be so
exciting!?
Their excitement is what makes me think my job is the best. Kinder artists are so much fun.
Here is a shot of my room these days....a painting factory!
Last week, we celebrated "Earth Day" every day in the art room. We used recycled materials to create our artworks. Thanks to some really wonderful staff and parents who provided us with recycled supplies, we had a bounty with which to work. I still have several boxes CDs left over from the library donations!
Each class, we began by discussing why protecting our planet is important. Students from kindergarten up through 5th grade made points about how a healthy planet is good for all living things. We talked about how we can do small things like recycling to help with waste and pollution. One of our enduring themes was recycling plastics so that they don't end up in landfills, or worse, our oceans.
Ocean pollution is a real threat to our marine ecosystems. Almost all of my art students got the opportunity to recycle plastics in their art making as a way to re-imagine the material. Some classes went a step further in demonstrating art activism in creating a collaborative mural to raise awareness about ocean pollution.
Here are some examples of the work we did!
Kindergarten recycled CDs from the school library to make tropical fish! They used pattern and color to make the scales using sharpie markers and cut shapes for fins. They were incorporated into the art activism mural.
1st graders recycled mixed materials from donations and the art room scrap bins. They used collage techniques to create a recycled robot. One class got to use donated corn starch packing peanuts to make sculptures. Just add a dab of water, and VOILA!, they stick together! Another 1st grade class created Spring blossom trees with recycled paper bags.
R2D2!
BB8!
I love how she matched the Sharpie hair to the yarn she chose.
The magic of corn starch peanuts in action!
A baseball player at bat!
2nd graders recycled plastic bags and lamination trimmings from the library to assemble jellyfish. We talked about how sea turtles mistake plastic bags for jellyfish and eat them, which makes them sick or even die.
I didn't capture too many photos of this lesson...womp womp!
3rd graders recycled plastic bottles by cutting them and coloring them with sharpies to produce tropical fish sculptures to go with the art activism mural.
4th graders recycled CDs by producing mandala designs with sharpie markers. They showed radial symmetry in their compositions.
5th graders got an extra week to work on their clay sculptures due to a field trip that happened during clay week. We did make some time at the end of class to discuss Earth Day and how artists can use recycled materials to make powerful works of art.
My intermediate Pathways class assembled recycled robots as well, but used more advanced building techniques.
I think we had a great time making recycled artworks. I hope that my students learned about how they can make a difference in their art making as well taking care of their planet. Here are some additional resources if my artists want to learn more about how artists use recycled materials to make fine works of art.