Instagram: Makeamark_artroom

Showing posts with label Sketchbooks. Show all posts

Thursday, November 5, 2015

Studying "Still Lifes" in 3rd Grade

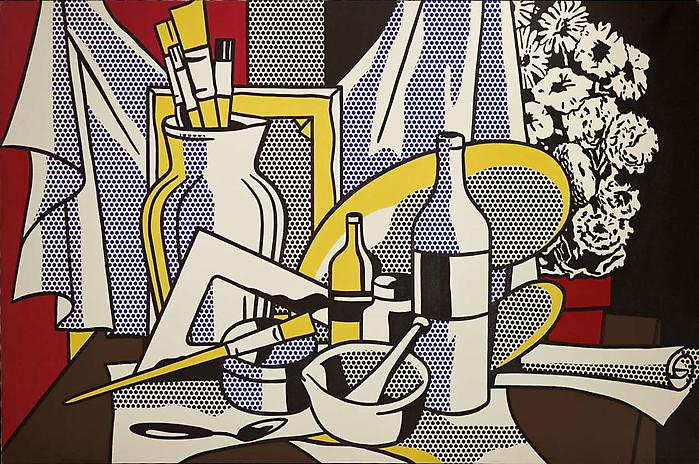
As the month of November has begun, 3rd grade has been introduced to the art of "Still lifes".  They were shown a series of famous still life paintings through art history and given a simple definition of Still Life: An artwork that depicts an arrangement of human-made and/or natural objects in a setting. They took notes in their sketchbooks while we did comparisons between different styles of still lifes.

An impressionism still life painted by Claude Monet

A "Fauvist" Still life painted by Henri Matisse

An example of a Pop Art still life by Roy Lichtenstein


A photograph still life created by Andy Warhol

The 3rd graders were asked to explain their knowledge in defining how each example was in fact a still life. This allowed me to assess whether they truly understood what qualified as a still life.

Afterward, I composed a still life of gourds under the document camera. I then asked the students to sketch this arrangement in their books. I explained that we are using observations to create the drawing rather than relying on our imagination.

We reviewed Monart's 5 basic elements of shape, size relationships, and overlapping techniques. I had the students trace the contour of the objects with their fingers in the air first to get a sense of the contour shapes. Once they felt comfortable with what they were observing, they began to draw.

Still life arrangement of gourds


Students are drawing in their sketchbooks.


3rd graders adding the color with crayons once they finished sketching.

The next class they were asked to draw other objects from observation.
 I was very pleased with the students' abilities in observing then drawing.  I like introducing this type of drawing in 3rd grade because this is the age when kids start to want to create realistic art. I leave plenty of room in the curriculum for imaginative expression but introducing them to still life art has opened up the door to begin realistically creating the illusion of space. As the year continues, we will study more techniques in communicating objects in space 2-dimensionally.


Monday, October 5, 2015

Sketchbooks in Action

These sketchbooks are worth their weight in educational gold! I've had the 3rd graders take notes in them as they learn new techniques and vocabulary. I've been teaching them to to take visual notes during a lesson too; this was and still is a useful strategy for me when I take classes. I've shown them that drawing pictures along with writing text enhances note-making and note-taking and better serve their learning objectives.

I've noticed in the previous year of teaching, intermediate students often would ask me to repeat instructions, re-define vocabulary we've practiced, and were confused if processes were more than two steps. Even if I had it all written on a power point slide or on the board, they often wouldn't retain the information. These sketchbooks have given these children a way to absorb the lesson more deeply.

Today, when I had used our new vocabulary word in a direction, a student raised their hand to ask me what that vocabulary word meant. Even before I could start to ask them to check their notes, they whipped open their sketchbook and said, "Oh, wait! I have it here! I got it!" This was rewarding to me. This kid took ownership over learning that word. My heart jumped for joy!


This photo shows a 3rd grade student using their notes to guide their art making process. I really love seeing those picture notes.

This photo shows 4th grade students working on a painting project. The student in the bottom left had her sketch book open to remind herself to include a variety of lines and shapes in her painting.


These sketchbooks are proving to be a powerful tool in the art room. I know these kids love them and take great care of them. I hope they are inspired to make and take them to their regular classrooms!


Friday, September 25, 2015

Textured Sketchbooks for 3rd & 4th grade

 I took a Summer institute class with Becky Friese for my visual art professional development and she had us make sketchbooks from card stock and chip board. She really encouraged us to try incorporate sketchbooks in our art rooms as a tool for student thinking, practice, and assessment. I thought to myself, "What a good idea! How can I make it work for me with recycled materials!?" Coincidentally, my absolute favorite art ed blogger Cassie Stephens posted about making sketchbooks with recycled file folders! How brilliant! She includes a tutorial video and provides examples of how her kids use their sketchbooks. I used most of her ideas but I didn't include the baseball card sleeve for "Artist Trading Cards" . I love the idea of these cards but want to learn more about how it works. Once I understand it better I'm thinking about adding in those sticky library book envelopes in the back cover later this year so we can try it out.


On the first day creating our sketch books I talked with the kids about how we could use paint to create textures. I demonstrated brush techniques as well as using texture combs (made from recycled plastic lids). We were experimenting with laying thick layers of paint on our folders (Shout out to Laura Roberts, secretary to Mike Sandner, Art Ed Director...by request, she sent me a big box of recycled file folders form the central office!). The students were asked to create a variety of textures using the brush and combs in a limited color paint palette. Once they dried, I added 20 sheets of sketch paper and stapled them.

 I really like how you can visually excavate the layers of color to reveal new colors. They remind me of the Abstract Expressionist movement in art history.


The second day we added the taped spine and name tags. I had given them the sketching prompt to fill their first page with zentangle patterns inside different size dots.  This was a response to reading the book "The Dot". I called them up one by one to check their sketches and add the finishing touches.


Here are some examples of 3rd & 4th grade completed sketchbooks.

I bought some roll-y bins from IKEA to store them in my room, one for each grade level with labeled dividers to keep the classes organized. 


I admit I was a little overwhelmed at the idea of sketchbooks at first but now that we did it, I realize how useful they are for the kids! So far we used them to brainstorm, take notes on my demonstrations, and practice new drawing skills! I plan to use this an assessment tool when it comes to grading too.

I look forward to seeing how they develop over the year! Thanks for reading!